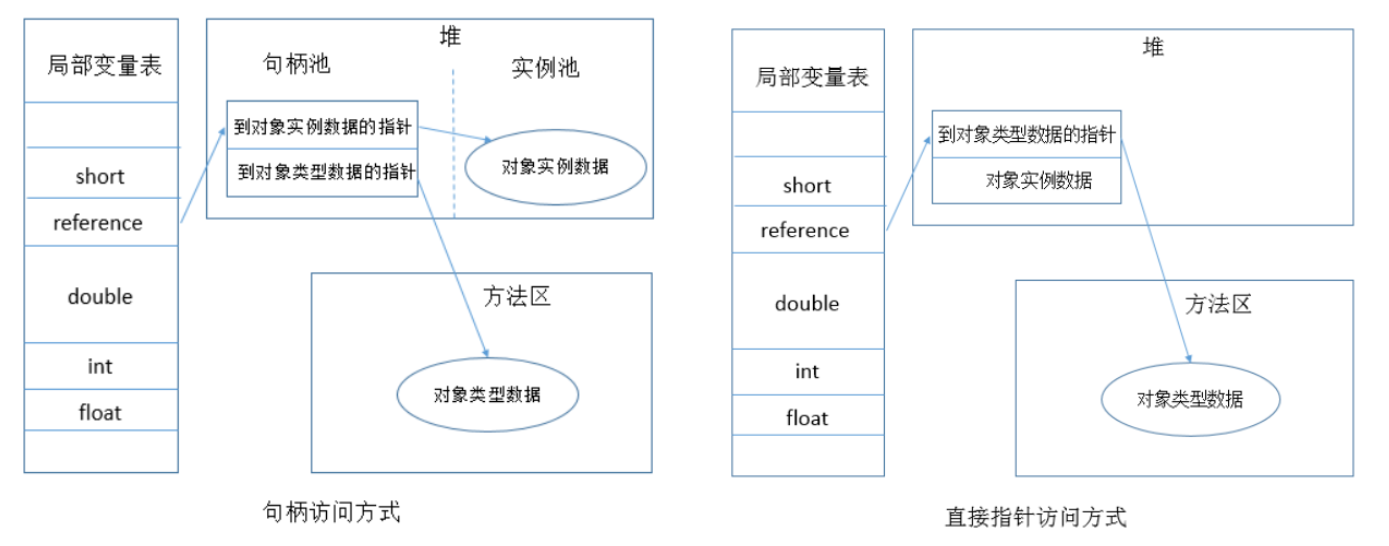
Java Concurrency
线程概念
线程是一种轻量级的进程内的执行单元,线程共用进程中的内存地址空间,但是拥有自己的调用栈,寄存器,程序计数器和局部变量。线程状态如下:
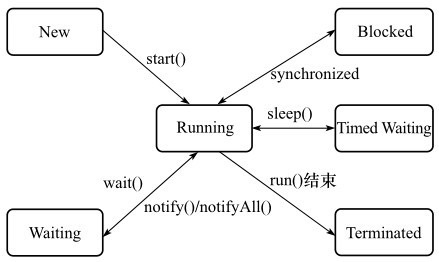
- 新建状态(New) : 线程对象被创建后,就进入了新建状态。例如,Thread thread = new Thread()。
- 就绪状态(Runnable): 也被称为“可执行状态”。线程对象被创建后,其它线程调用了该对象的start()方法,从而来启动该线程。例如,thread.start()。处于就绪状态的线程,随时可能被CPU调度执行。
- 运行状态(Running) : 线程获取CPU权限进行执行。需要注意的是,线程只能从就绪状态进入到运行状态。
- 阻塞状态(Blocked) : 阻塞状态是线程因为某种原因放弃CPU使用权,暂时停止运行。直到线程进入就绪状态,才有机会转到运行状态。阻塞的情况分三种:
- 等待阻塞 – 通过调用线程的wait()方法,让线程等待某工作的完成。
- 同步阻塞 – 线程在获取synchronized同步锁失败(因为锁被其它线程所占用),它会进入同步阻塞状态。
- 其他阻塞 – 通过调用线程的sleep()或join()或发出了I/O请求时,线程会进入到阻塞状态。当sleep()状态超时、join()等待线程终止或者超时、或者I/O处理完毕时,线程重新转入就绪状态。
- 死亡状态(Dead/Terminated) : 线程执行完了或者因异常退出了run()方法,该线程结束生命周期。
多线程概念
多线程是利用线程并行和并发处理的优势提升程序性能的一种编程方法。
优点:
- 可以使每个线程做自己的任务,代码上语义更明确
- 利用多核CPU的优势
- 可以把占据时间长如阻塞UI的任务放到后台处理从而保证界面/线程响应
- 可以提升CPU利用率,通过回调方式而不是阻塞方式处理IO操作
缺点:
- 线程安全问题(脏数据,死锁)
- 性能问题(活锁,饥饿,上下文切换开销)
- 线程本身需要更多的内存
线程管理的基本工具(及Executor框架)
创建一个新线程
Thread类是一个实体类,继承Thread类,重写RUN方法
1
2
3
4
5
6
7
8
9
10
11
12
13
14
// 也可以 public class MyThread extends Thread {
public class MyThread implements Runnable{
static Object o = new Object();
static int number = 0;
public void Run(){
for(int i = 0; i < 1000;i++){
sychronized(o){
number++;
}
}
}
}实现RUNABLE 接口,实例对象作为THREAD的构造函数的传参。
1
2
Thread t = new Thread(new MyThread());
t.start();实现CALLABLE接口,通过FUTURETASK来创建
1 |
|
通过线程池本身ThreadPoolExecutor进行task管理。线程池是一个功能强大的多线程工具,在每一个新的Runnable提交的时候,会有如下流程处理:

在线程池处理task过程中,会需要如下参数控制流程: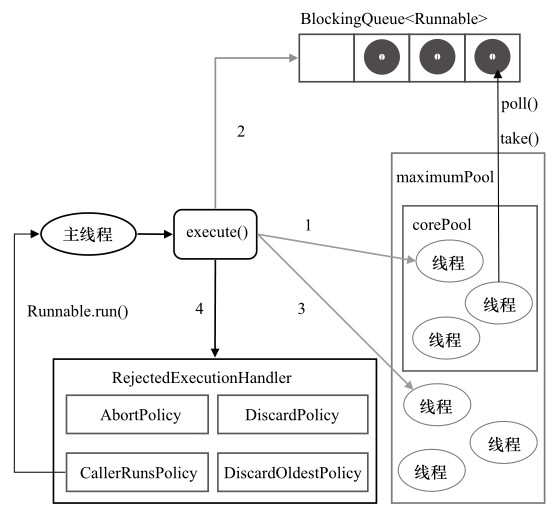
通过线程池工厂Executors生成ExecutorService接口下的实例,创建并执行任务。
1 | const int POOL_NUM = 5; |
通过Object方法控制线程并发
wait/notify(wait(), await(), notify() notifyAll())是Object的方法,运用了实例本身的锁功能控制多线程的并发访问和修改问题。
* wait的语义是释放当前拿到的锁,让本线程进入睡眠状态。
* notify的语义是通知其他线程唤醒,让原本是waiting状态的线程变成了blocked(同步块中释放锁,重新等待拿锁恢复同步块内代码wait()后继续执行)。
一般的应用场景是,wait释放锁,notify别的线程来拿锁,并唤醒继续执行。这些方法必须在已经获得锁的同步块中书写,否则会抛出illeagalmonitorStateException。这属于线程的基本工具,一般推荐使用已有的并发框架,而非此类方法。
1 | // the standard idiom for using the wait method |
线程调度器Scheduler
- static Thread.yeild():可以让步出当前线程的优先级,让其他同优先级的线程先跑。
- Thread.join(): 当前线程等待一个线程t(join的实例)完成后再继续执行。类似于
1
2
3
4
5
6
7
8synchronized(this){
// if t is alive, keep waiting
while(isAlive()){
wait();
}
// continue current thread
} - static Thread.sleep(): 保持拿锁,线程睡眠一定时间。与wait()不同之处在于前者锁并没有释放。
- Thread.interrupt(): 调用中断的线程去中断别的线程,被中断的线程如果处于等待/睡眠状态,会抛出InterrupException,如果处于阻塞于IO状态,会抛出ClosedByInterruptException,并且连接中断,如果阻塞与selector,则会出发selector’s wakeup方法,并且状态Thread.interrupted()变成true。其他情况,直接Thread.isInterrupted()/static Thread.interrupted()变成true。在异常处理完毕后,线程的中断标志位会复位,从而允许再一次中断。
- Deprecated方法有suspend(),resume(),stop()能让线程暂停,恢复运行和完全停止。需要留意的是线程被suspend和stop并不会释放线程已经拿到的锁,所以不是一个很好的终止线程的方法,而中断则可以在异常捕捉处理好锁释放,资源释放的逻辑。
线程通信
volatile, synchronized(略)
wait/notify(略)
pipewriter/pipereader:将管道的输出连接到其他线程的输入从而达到通信目的。
1
2
3
4
5
6
7
8
9
10
11
12
13
14
15
16
17
18
19
20
21
22
23
24
25
26
27
28
29
30
31
32
33
34
35
36
37
38public class Piped{
public static void main(String[] args){
PipedWriter out = new PipedWriter();
PipedReader in = new PipedReader();
//连接
out.connect(in);
Thread printThread = new Thread(new Print(in), "PrintThread");
printThread.start();
int receive = 0;
try{
while((receive = System.in.read()) != -1){
out.write(receive);
}
} finally{
out.close();
}
}
static class Print implements Runnable{
private PipedReader in;
public Print(PipedReader in){
this.in = in;
}
public void run(){
int receive = 0;
try{
while((receive = in.read()) != -1){
System.out.print((char) receive);
}
}catch(IOException ex){
}
}
}
}join(略)
ThreadLocal: ThreadLocal集合类型可以为线程提供局部变量,在多线程场景下,保证线程自由变量的安全。常用于AOP代码,例如计时器。
1
2
3
4
5
6
7
8
9
10
11
12
13
14
15
16
17
18
19
20
21public class Profiler{
private static final ThreadLocal<Long> TIME_THREADLOCAL = new ThreadLocal<Long>(){
protected Long initialValue(){
return System.currentTimeMillis();
}
};
public static final void begin(){
TIME_THREADLOCAL.set(Stystem.currentTimeMillis());
}
public static final long end(){
return System.currentTimeMillis() - TIME_THREADLOCAL.get();
}
public static void main(String[] args){
Profiler.begin();
TimeUnit.SECONDS.sleep(1);
System.out.println("Cost: " + Profiler.end() + " mills");
}
}Exchanger类: Exchanger是一个用于线程间协作的工具类。Exchanger创建了一个同步点,当两个线程都到达同步点时,数据进行交换。应用场景如下:
遗传算法(1/2基因数据交换)
校对工作(AB岗两人进行录入对稿)
Exchanger使用示例:
1
2
3
4
5
6
7
8
9
10
11
12
13
14
15
16
17
18
19
20
21
22
23
24
25
26
27
28
29
30
31
32public class ExchangerTest {
private static final Exchanger<String> exgr = new Exchanger<String>();
private static ExecutorService threadPool = Executors.newFixedThreadPool(2);
public static main(String[] args) {
threadPool.execute(new Runnable() {
public void run() {
try{
String A = "流水数据A";
//A录入银行流水数据
exgr.exchange(A);
}catch (InterruptedException e) {
}
}
});
threadPool.execute(new Runnable() {
public void run() {
try{
String B = "流水数据B";
//B录入银行流水
String A = exgr.exchange(B);
System.out.println("A和B数据是否一致:" + A.equals(B));
}catch (InterruptedException e){}
}
});
threadPool.shutdown();
}
}
线程上下文管理工具
Executor框架
Executor框架定义了各个Task在线程池/单线程执行的上下文。Developer可以自己实现Executor框架来自定义Task执行上下文。Executor支持的线程池框架有ThreadPoolExecutor和ScheduleThreadPoolExecutor,主要负责处理相对独立的任务。
在新线程执行
1
2
3
4
5
6
7public class ThreadPerTask implements Executor {
public void execute( Runnable task){
new Thread(task).start();
}
}在同一个线程执行
1
2
3
4
5public class InThreadTask implements Executor {
public void execute( Runnable task){
task.run();
}
}ExecutorService接口扩展了Executor接口,支持更加多的接口去控制executor的周期。当ExecutorService被shutdown()后,不再接受submit(),当其执行完所有task后,就终止。
Running ===>
Shutting down ===>
Terminated
CoompletionService
Executor和BlockingQueue的组合。
Fork/Join框架
Fork/Join框架适合大量task并发执行,由于task可以在不同的线程进行根据空闲程度自由调度,所以具有特定的执行设计场景(一般是只读场景):
- 归并排序
- map/reduce
- 递归多线程计算
ForkJoinPool线程池是Fork/Join执行框架的线程池,也是Executor框架的一种。也是CompletableFuture的底层线程池实现。
Fork/Join使用示例
1
2
3
4
5
6
7
8
9
10
11
12
13
14
15
16
17
18
19
20
21
22
23
24
25
26
27
28
29
30
31
32
33
34
35
36
37
38
39
40
41
42
43
44
45
46
47
48
49
50
51
52
53
54public class CountTask extends RecursiveTask<Integer> {
private static final int THRESHOLD = 2; //阈值
private int start;
private int end;
public CountTask(int start, int end) {
this.start = start;
this.end = end;
}
protected Integer compute() {
int sum = 0;
//如果任务足够小就计算任务
boolean canCompute = (end - start) <= THRESHOLD;
if ( canCompute) {
for (int i = start; i <= end; i++) {
sum += i;
}
}else {
//如果任务大于阈值,就分裂成两个子任务计算
int middle = (start + end) / 2;
CountTask leftTask = new CountTask(start, middle);
CountTask rightTask = new CountTask(middle + 1, end);
//执行子任务
leftTask.fork();
rightTask.fork();
//等待子任务执行完,并取到结果
int leftResult = leftTask.join();
int rightResult = rightTask.join();
//合并结果
sum = leftResult + rightResult;
}
return sum;
}
public static void main(String[] args){
ForkJoinPool forkJoinPool = new ForkJoinPool();
//生成一个计算任务,负责计算1+2+3+4
CountTask task = new CountTask(1, 4);
//执行任务
Future<Integer> result = forkJoinPool.submit(task);
try {
//检查task执行结果
if(task.isCompletedAbnormally()) {
System.out.println(task.getException());
}
System.out.println(result.get());
} catch (InterruptedException e) {
} catch (ExecutionException e) {}
}
}BlockingQueue阻塞队列
提供两个可以阻塞当前线程的方法扩展Queue的操作,常用于生产者和消费者场景。
- take() 移除元素,当队列为空时,获取元素的线程会等待队列变为非空。
- put() 增加元素,当队列满的时候,队列会阻塞插入元素的线程,直到队列不满。

阻塞队列支持四种处理方式,如上图所示,包含7个阻塞队列:
- ArrayBlockingQueue, 由数组结构组成的有界阻塞队列。
- LinkedBlockingQueue, 由链表结构组成的有界阻塞队列。
- PriorityBlockingQueue, 支持优先级排序的无界阻塞队列。
- SynchronousQueue,一个不存储元素的阻塞队列。
- DelayQueue, 使用优先级队列实现的无界阻塞队列。
- LinkedTransferQueue, 链表结构组成的无界阻塞队列。
- LinkedBlockingDeque, 链表结构组成的双向阻塞队列。
线程同步器Synchronizer
同步器是使线程能够等待另一个线程,允许他们协调动作的工具类。
- 信号量Semaphore
信号量是用来控制同时访问特定资源的线程数量的锁,某个时候只能由n个线程同时访问该同步资源,n=1时候信号量和简单互斥锁一样。
- CountDownLatch
CountDownLatch允许一个或多个线程等待其他线程完成操作。当这n个线程都完成时,当前等待线程再执行, CountDownLatch内部的计数器不能重置。
- CyclicBarrier
CyclicBarrier,让一组线程到达一个同步点后再一起继续运行,在其中任意一个线程未达到同步点,其他到达的线程均会被阻塞。
- Phaser
Phaser可以理解为CyclicBarrier的更复杂应用,通过控制每个阶段的锁来控制线程行为。Phaser在n个线程完成一个阶段后才进入下一个多线程阶段。
- Condition 类
Condition类提供了wait(), notify(), notifyAll()接口方法,可以灵活制定锁的行为,同时避免了锁和object的一对一对应关系。condition.wait()释放锁等待,condition.signal()唤醒等待的线程(需要尽快释放锁保证notify成功)。Condition类是BlockingQueue实现的关键类。
1 | class BoundedBuffer { |
- LockSupport 类
LockSupport定义了一组公共静态方法,是一个基础工具,提供了线程阻塞和唤醒功能。
| 方法名 | 描述 |
|---|---|
| park() | 阻塞当前线程,如果调用unpark(),park()才会返回 |
| parkNanos(long nanos | 阻塞当前线程不超过nanos秒 |
| parkUntil(long deadline) | 阻塞当前线程,直到deadline时间 |
| unpark(Thread t) | 唤醒处于阻塞状态的线程t |
多线程问题
- 数据访问问题(读写)
- 资源生产与消费问题(生产者-消费者模式)<= 常用来解决数据的强耦合问题
下文会展开描述这两类问题。
多线程数据读写访问问题(同步/并发问题)
由于多线程情况下JVM的内存模型,实际上是存在主内存和工作内存之间的同步问题。读写操作实际上是read-load, store-write操作,在多线程并发时,操作的并发会导致主内存和工作内存某变量值的不同步问题。
synchronized 关键字
synchronized可以在三个地方使用,一种是在方法体内部,可以进行instance level或者class level(通过synchronized(AccountSync.Class))进行锁定。最后一种是在一个代码块进行锁定,可以指定拿锁的object。
当synchronized锁定在(静态)方法级别,所有(静态)method只能有一个method被线程调用,其他线程需要等待。同一个线程可重入synchronized区块/方法。
当synchronized锁定在instance级别时,取决于instance的状态,所有需要拿该instance的线程需要等待。也就是说,即使是同一个instance的不同的synchronized method,在某时刻,只能有一个线程访问其中某个synchronized method。
当synchronized锁定在block级别是,需要制定block的owner,即一个object,只有拿到了该object的锁,才能执行相应的block。只是比较推荐的方法,因为可以最小化同步块,同时也能避免基类方法和父类方法的访问造成的“互相绊住脚”的行为。
1 | public class AccountSync { |
锁
Lock是java的一个interface,所有实现了该接口的类型都具有锁的特质。
不可重入锁(简单锁)
Java底层为每个object提供了mutex,没有拿到锁的线程需要忙等待,没有优先级控制。
简单锁本身在java内部没有直接的实现,可以通过Semaphore计数值为1来实现。可重入锁ReentrantLock
同一个线程可以重复进入该锁(不会因为同步代码自己调用自己而被死锁)
1 | Lock l = new ReentrantLock(); |
- 读写锁
读写锁是两个锁,分别对应
ReentrantReadWriteLock.ReadLock,ReentrantReadWriteLock.WriteLock。
读锁,没有线程hold写锁的时候,写锁可以给出,或者读锁可以给多线程访问。
写锁,没有线程hold读锁和写锁的时候,读锁可以给出,一旦写锁先被hold,读锁是不允许再被hold。
读写锁的特性如下:

1 | public class ReadWriteMap{ |
并发集合Concurrent collection
- ConcurrentHashMap
HashMap并发问题:
HashTable容器使用synchronized来保证线程安全,但在线程竞争激烈的情况下HashTable的效率非常低下。因为当一个线程访问HashTable的同步方法时,其他线程访问HashTable的同步方法时,可能会进入阻塞或轮询状态。如线程1使用put进行添加元素,线程2不但不能使用put方法添加元素,并且也不能使用get方法来获取元素,所以竞争越激烈效率越低。
ConcurrentHashMap解决并发问题:
ConcurrentHashMap所使用的锁分段技术,首先将数据分成一段一段的存储,然后给每一段数据配一把锁,当一个线程占用锁访问其中一个段数据的时候,其他段的数据也能被其他线程访问。有些方法需要跨段,比如size()和containsValue(),它们可能需要锁定整个表而而不仅仅是某个段,这需要按顺序锁定所有段,操作完毕后,又按顺序释放所有段的锁。这里“按顺序”是很重要的,否则极有可能出现死锁,在ConcurrentHashMap内部,段数组是final的,并且其成员变量实际上也是final的,但是,仅仅是将数组声明为final的并不保证数组成员也是final的,这需要实现上的保证。这可以确保不会出现死锁,因为获得锁的顺序是固定的。
ConcurrentHashMap的使用和HashMap相同,API如下:
|API名|操作含义|
|:---|:---:|
|get()|拿key对应的value|
|put()|放元素V|
|size()|获取大小|
|remove()|删除元素|
|putIfAbsent()|存放元素如果没有|
- ConcurrentLinkedQueue
线程安全队列有两种实现方式,一种是阻塞算法加锁,另一种是使用循环CAS的方式。ConcurrentLinkedQueue采用的是后者,基于链接节点的无界限线程安全队列。
offer()是入队,将节点添加到队尾。
poll()是出队,将首节点拿出。
减少死锁优化
- 减少锁的持有时间(同步方法改同步块)
- 减少锁的粒度(CONCURRENT HASHMAP)
- 锁分离(读写锁,读锁写锁)(LinkedBlockingQueue,PUT一把锁,锁尾巴,TAKE一把锁锁头)
无锁并发工具
在多核操作系统中,Java提供了很多无锁并发工具。没有需要加锁的需要,避免了developer自己处理线程的阻塞行为,减少这部分开销。原来某些需要锁的场景,通过限制计算机指令执行和强制线程内部缓存失效,可以达到并发读写的需求,而不需要用锁来控制线程访问。
- volatile 关键字
volatile的读写,可以看作是一个锁,对该变量的读写操作进行了同步。概括的说,保证内存可见性,防止指令重排序。
- final 关键字
凡是对成员变量或者本地变量(在方法中的或者代码块中的变量称为本地变量)声明为final的都叫作final变量。final变量经常和static关键字一起使用,作为常量。final变量能保证其初始化的同步操作。
- 原子操作
原子操作是指不受多线程影响的最基本单元操作,可以保证同步。
Java在JVM层面也支持了同步,lock-free操作,利用CAS无所算法和乐观锁假设(仅在修改数据时候检查锁状态,适合并发修改比较少的情况)。底层是基于读写锁实现。
CAS是利用CPU的CAS指令,同时借助JNI来完成Java的非阻塞算法,实现原子操作。是直接调用CPU 的cmpxchg(是汇编指令)指令。
CAS有3个操作数,内存值V,旧的预期值A,要修改的新值B。当且仅当预期值A和内存值V相同时,将内存值V修改为B,否则什么都不做。
下列操作为原子操作:
- all assignment of primitive types except for long and double. (并不是说primitive types的所有操作都是原子操作)
- all assignment of references
- all operations of Java.Concurrent.Atomic.* classes
- all assignments to volatile longs and doubles
原子类型by Java
java.util.concurrent.atomic包提供了primitive类型的atomic类,它们可以自动的保证对于他们的操作是原子的并且不需要使用同步。但是使用方法和primitive类型完全不同,atomic类型里提供了各种操作方法保证方法/方法流执行的原子性。
- AtomicBoolean,AtomicInteger,AtomicLong,AtomicReference
通过原子的方式更新数组里的某个元素,Atomic包提供了以3类
- AtomicIntegerArray,AtomicLongArray,AtomicReferenceArray
如果需原子地更新某个类里的某个字段时,就需要使用原子更新字段类,Atomic包提供了以下3个类进行原子字段更新。
- AtomicLongFieldUpdater,AtomicIntegerFieldUpdater,AtomicReferenceFieldUpdater
1 |
|
多线程的资源生产与消费问题
Java的Vector容器实际上是线程安全的数据结构,也就是说Vector的各个操作都能保证其原子性,但是也会存在多线程问题。这是因为在Vector的删除和添加操作中,如果存在多线程并发,删除操作的对象是可能是一个空Vector容器,造成问题。Developer需要有很好的上下文控制来避免这种生产消费问题。